
Hello friends! Welcome back to the blog.
Today we are going to solve a very big headache. You know that feeling when you are filling out a form online? You are in a good mood, you want to contact the company, you type your name, you type your email, and everything is going smooth.
Then comes the “Country” and “State” section.
You select “India” as your country. Good. Then you click on the “State” dropdown. And suddenly, you see a list of 5,000 states from all over the world. You see Alabama, Alaska, Arizona… and you have to scroll, scroll, and scroll. By the time you reach your actual state, you have forgotten why you were filling the form in the first place.
It is very annoying, isn’t it?
Why should a person sitting in New Delhi see “California” in the state list? It makes no sense. It is like asking for a cup of tea and the waiter is reading you the menu for Italian pasta.
But tension not! If you are using Elementor, you might be thinking, “Elementor is so powerful, surely it has this feature built-in?”
Well, I have some bad news and some good news. The Bad News: Standard Elementor is a little bit stingy here. It does not have this “Linked Field” feature by default. It just gives you a simple dropdown, and you have to do all the hard work manually. The Good News: We have a very smart solution! And not just any solution, but a proper, professional method using Cool FormKit.
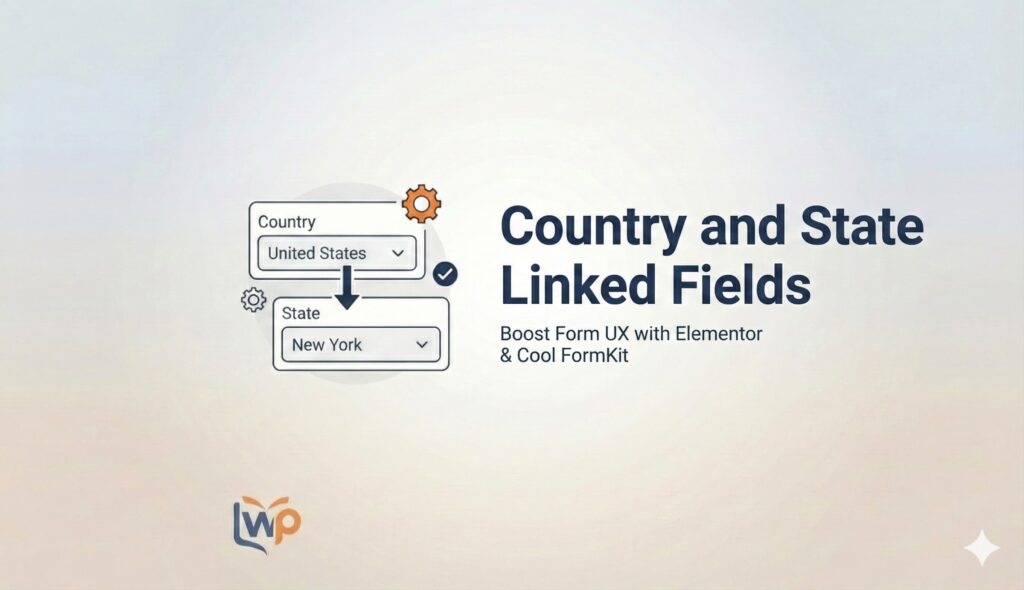
In this guide, I will tell you exactly How to Add Country & State Linked Fields to Elementor Forms. We will make it so smart that if a user selects India, only Indian states will show up. If they select USA, only US states will show up.
Magic? No, just smart work. Let’s start!
Why Is This So Important? (A Little Bit of Logic)
Before we jump into the “How-To,” let’s understand the “Why.” Why should you waste your time setting this up? You might think, “Let the user scroll, what is the problem?”
1. It saves time for your user: Humans are very lazy. We want everything fast. Imagine your user is filling out a contact form on their mobile. Their thumb will get tired scrolling through every province in Canada just to find “Karnataka.” If you make them work too hard, they will get frustrated and leave your website. You just lost a customer because your form was too long.
2. Accurate Data: If you let people type their state manually in a text box, it will be a disaster. One person will type “Maharashtra,” another will type “MH,” and someone else will type “Maha.” Your database will look like a total mess. Using a linked dropdown keeps everything neat and clean. You get the exact spelling every time.
3. It looks Professional: When your form behaves smartly, your website looks professional. It shows that you care about the User Experience. It gives a “VIP feeling” to the visitor. They think, “Wow, this website knows that I am from India, very smart.”
So, are you ready to make your Elementor Form smarter? Let’s go.
What You Need (The Ingredients)
To cook this dish, you need two simple things:
- Elementor Plugin (You can use the Free or Pro version, but you need the Form widget).
- Cool FormKit.
Cool FormKit is like the secret spice that makes Elementor tasty. It adds many features that Elementor forgot to add. Today, we are focusing entirely on the Country and State modules.
Step-by-Step Guide: Making the Fields Talk to Each Other
Follow these steps carefully. Do not skip anything, otherwise, your form will get confused and will not work!
Step 1: Switch on the Button (The Setup)
First things first. You cannot drive the car if the engine is off. Similarly, you cannot use the Country/State field if you have not enabled it in the settings.
- Go to your WordPress Dashboard.
- Look for Elementor in the side menu.
- Hover over it and click on Cool FormKit.
- Go to the Form Elements Tab.
- Here you will see many switches and options. Find the one that says Country & State Field.
- Turn it ON.
- Make sure you save the settings!
That is it. Half the work is done mentally. Now the plugin is ready to do the heavy lifting.
Step 2: Adding the “Boss” Field (The Country)
Now, open the page where your form is located. Click “Edit with Elementor.”
We will first add the Country field. This is the “Boss” field because the State field will listen to whatever this Boss says.
- Click on your Form widget.
- Click on Add Item to add a new field.
- In the Type dropdown, don’t select “Select” or “Text.” Look for a special type called “Country”. (If you don’t see it, go back to Step 1 and check if you enabled the plugin correctly!)
- Once you select “Country,” you will see some new, fancy settings appear below.
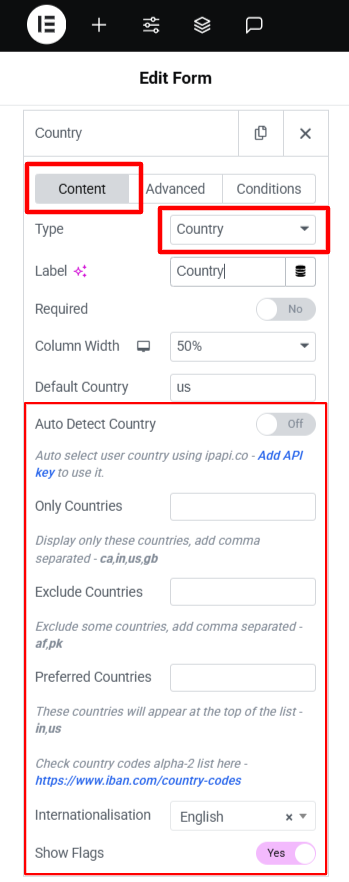
Let’s look at these fancy settings one by one, because they are very useful:
A. Auto Detect Country (The Magic Trick)
There is an option called “Auto Detect Country.” If you turn this ON, the form will check the user’s internet location (IP address). If the user is sitting in New Delhi, the form will automatically select “India” for them. They don’t even have to click! Important Note: To make this work perfectly, the plugin asks for an API Key. There is a link there saying “Add API Key”. Just click it, get the key, and paste it. It is very simple.
B. Only Countries (The VIP List)
Suppose you only do business in India, USA, and UK. Why show “Zimbabwe” or “Peru” in the list? It is unnecessary clutter. In the “Only Countries” box, you can type the names of the countries you want.
- Example: India, United States, United Kingdom. Now, your dropdown will only show these three. Nice and clean.
C. Exclude Countries (The Block List)
This is the opposite of the above. Maybe you ship everywhere EXCEPT Antarctica (because shipping is too expensive there). You can put “Antarctica” in this list, and it will hide from the dropdown.
D. Preferred Countries (The Favourites)
This is my absolute favorite feature. You know how usually “India” is somewhere in the middle under ‘I’? You have to scroll down to find it. In the “Preferred Countries” box, type “India.” Now, even though the list is alphabetical, India will appear at the very top. It is like reserving the front seat for your best friend. It makes life so much easier for your local customers.
Step 3: Adding the “Follower” Field (The State)
Now that the Boss (Country) is ready, let’s add the Assistant (State).
- Click Add Item again in your form to make another field.
- Change the Type to “State”.
- Give it a label like “Select State.”
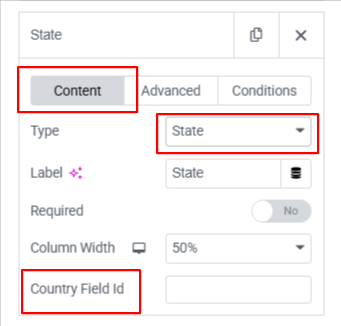
Now, here is the most important part. Please pay full attention here.
Right now, this State field is lonely. It doesn’t know who its partner is. We have to introduce it to the Country field so they can link up.
- Go back to your Country Field (the one we made in Step 2).
- Click on the Advanced Tab of that field.
- Look for the ID field. Copy that ID text. (It might look like
field_1or you can rename it tomy_country_field). - Now, come back to your State Field.
- You will see a box called “Country Field ID”.
- Paste the ID you copied here.
Boom! Connection established. Now the State field knows: “Okay, I have to check what is selected in that Country field, and show options accordingly.”
Step 4: The Moment of Truth (Testing)
You have done the setting. You have pasted the ID. Now, do not just close the laptop and go to sleep. We must test it! Never trust technology blindly, my friends.
- Click the green Update button to save your page.
- Click the Preview (Eye icon) button.
- Now, act like a user.
- Select India in the Country field.
- Click the State dropdown. Do you see Delhi, Punjab, Kerala? Yes? Very good!
- Now change the Country to United States.
- Check the State dropdown again. Did it change to California, Texas, Florida? Yes?
If it works, give yourself a pat on the back. You have successfully created a Country-State linked form without writing a single line of scary code.
Common Mistakes (Where People Get Stuck)
Even though it is simple, sometimes things go wrong. Here is a checklist if it is not working for you:
- Wrong ID: This is the number one mistake. You pasted the wrong ID in the “Country Field ID” box. Check it again. It must match exactly with the Country field’s ID.
- Forgot to Enable: You forgot Step 1 and didn’t turn on the module in Cool FormKit settings in the dashboard.
- Cache Issue: Sometimes your browser is showing you an old version of the page. Clear your cache or open the page in an Incognito window (Private window) to check.
FAQs
Can I use this for City also?
Currently, Cool FormKit focuses on Country and State. For cities, the list would be too huge (millions of cities!)
Will this slow down my site?
Not at all. The script is very lightweight. It only loads when the form loads. Your site will run smooth like butter.
Do I need to pay for Google Maps API?
No! That is the best part. This is not using Google Maps. It uses a built-in list of countries and states. So it is totally free to use in that regard.
Conclusion
So friends, that is how you do it.
Adding a Country and State linked field in Elementor used to be very difficult task. You had to hire a developer or copy-paste long computer codes that looked like alien language.
But with Cool FormKit, it is super easy.
By doing this small change, you make your form easier to fill. And when forms are easy to fill, more people fill them. And when more people fill them, you get more business. Simple logic!
So go ahead, try this on your website today. Your users will thank you (silently, in their heads) for not making them scroll through 200 countries.
If you get stuck anywhere, simply read the steps again or drop a comment below.
Happy creating, and may your forms always be full of leads!
Okay, bye!